 Study Prompt
AI Image prompt
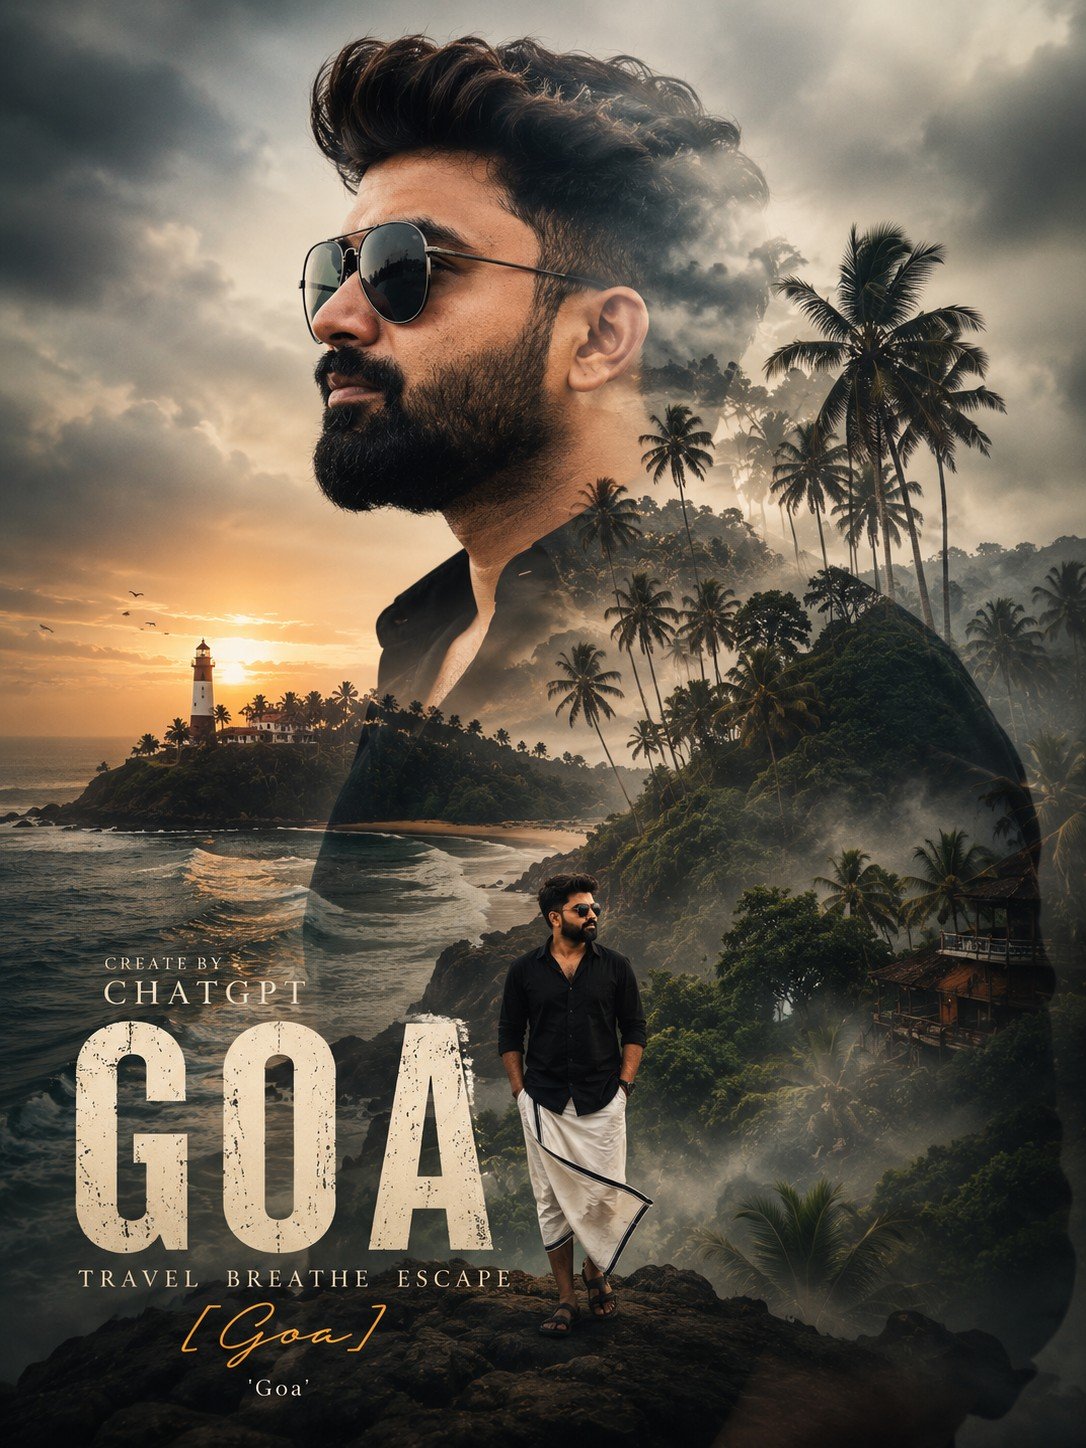
AI Double Exposure Travel Poster Prompt : Turn any uploaded photo or video frame into a breathtaking cinematic double exposure travel poster. AI automatically detects the location, landscape, and travel atmosphere, then creates a premium Netflix-style travel advertisement featuring the same person blended with the destination in ultra-realistic 8K quality, complete with elegant typography and dramatic cinematic lighting.
Study Prompt
A coastline inside a face silhouette, a mountain ridge following the outline of a profile, or a city scene blended into a portrait: this travel-poster concept connects the traveller with the place around them.
The prompt asks ChatGPT to read the visible scenery in your uploaded image and use it as the starting point for a cinematic double-exposure composition. A large side profile carries the landscape, while a smaller full-body version of the same person stands in the foreground. A destination title and a short tagline complete the travel-advertisement look.
The scene should grow from the photograph you provide. A coast, forest, mountain setting or city each offers different shapes, light and textures. Those visible details can guide the poster without forcing every photograph into the same misty mountain background.
The large profile provides the main outline. Inside and around it, the landscape should remain readable enough to suggest the setting. The smaller standing figure gives the artwork a human focal point and a sense of scale.
Clouds, soft haze and cinematic lighting can connect the layers. Keep enough separation around the forehead, nose and chin for the profile to remain recognisable. The aim is one blended travel composition, rather than several unrelated images placed beside each other.
Recognising a landscape type is different from identifying its exact location. A photograph may clearly show a tropical beach or a forested hillside without providing enough evidence to name the town or destination.
Distinctive landmarks can offer stronger clues, but an automatically suggested place name still needs checking. A generic beach should not be labelled Goa simply because it has sand and palm trees. Likewise, naming the “nearest famous destination” requires a reliable starting location, not just a similar atmosphere.
The supplied prompt includes the fixed word “GOA.” That wording may influence the title even when another photograph is uploaded. Keep it for an intended Goa poster; for a different trip, state the correct destination or replace that title instruction before submitting.
If you do not know the location, ask for a landscape-led design without an unverified destination label:
Use the scenery visible in my uploaded photo to guide the poster. If the exact destination cannot be established, describe the landscape without inventing a location name or labelling it as a nearby famous place.
If you are starting from a travel video, save a clear still frame and use that image for this workflow. Choose a moment without heavy motion blur or large captions covering the scene. The requested output is a poster image, not a video created from the clip.
One photograph can provide both references when it shows you clearly within the destination. If your face is very small in the travel shot, a second, clearer portrait can give you a better reference for checking likeness.
If you attach separate images, explain their roles. For example, identify the portrait as the reference for the person's appearance and the travel photograph as the reference for the landscape. This avoids asking ChatGPT to guess which details belong to which image.
A landscape-only photograph does not show your appearance. A tightly cropped selfie may not show the destination. Supply the missing reference when you want both to be represented, rather than expecting either image to contain information outside its frame.
The side profile and smaller standing figure should resemble the same person. Compare the hairstyle, facial outline, skin tone and visible clothing. A newly generated profile angle or body pose may differ from the source, so an exact likeness cannot be guaranteed.
The title should be easy to read without covering the main face or the most important landscape detail. A quiet patch of sky or background space can provide room for the destination name.
Use the confirmed name and check every letter. If you want a short supporting line, one possible version is “TRAVEL • BREATHE • ESCAPE.” Keep the title and tagline distinct in size so they do not compete for attention.
The pasted wording contains several separate text fragments. State explicitly which words should appear in the artwork. If “CHATGPT” or another fragment is not intended as poster lettering, ask for it to be omitted.
For reliable control over the final typography, you can request the artwork with empty title space and add the text in a design editor. Review generated lettering even when it looks convincing at first glance.
The prompt requests a vertical 3:4 poster: three units wide and four units tall. For example, 1080 by 1440 pixels has those proportions, although the actual generated dimensions need to be checked after downloading.
Within that frame, the large profile, landscape, smaller figure and title need a clear order. Let the foreground person remain visible instead of placing them across the main facial features.
This is a still-image layout. If you later use it in a Reel or another video project, adapt it to that project's canvas and check the crop. Stretching the poster can distort the face and scenery.
The same double-exposure idea can work across different landscapes. These are creative directions to try, rather than tested results or claims about a particular destination.
Moody colour grading should suit the landscape. Try softer highlights or cooler distant shadows when they support the source image, while keeping the person's complexion natural. Avoid applying such a strong colour wash that the coastline, greenery or buildings lose their character.
The weather mood comes from the image's visible appearance. It is not a verified report of the actual weather at the destination. If documenting your trip faithfully matters, ask to retain the original sky, season and lighting rather than introducing fog or storm clouds automatically.
Provide the confirmed name and ask for a title correction while retaining the composition. If the location is unknown, remove the unverified label instead of choosing a famous destination by resemblance.
Ask for clearer facial boundaries and less texture across the eye, nose and mouth. Keep stronger blending around the outer silhouette and lower portrait area.
Refer back to the original portrait and request the same identity, hairstyle and natural skin tone in both views. Identify which view needs correction.
Request a more natural scale, matching light direction and a coherent ground shadow. Check that the feet meet the surface rather than floating above it.
Ask to retain the visible coastline, ridges, trees or buildings from your travel photograph. Reduce newly invented scenery if it changes the character of the location.
Specify the exact permitted title and tagline, and ask to remove other lettering. For final text control, add the typography separately after generating the artwork.
Reduce the atmospheric effect near the face and foreground person, keeping it mainly between distant landscape layers.
These are suggested revisions, not guaranteed fixes. Make one main adjustment at a time and inspect the new image for changes elsewhere.
“DSLR photography look,” “ultra realistic” and “8K HDR quality” describe the intended finish. They do not establish that a physical camera captured the image or that the downloaded file has a particular resolution or HDR format.
The travel-documentary styling suggests a dramatic editorial presentation. It should not be presented as an official documentary release or an authorised brand production simply because a brand name appears in the prompt.
Before saving, inspect the face, foreground figure, blended edges and lettering at full size. Then view the poster smaller to check whether the destination and main subject are still easy to read.
No exact identification should be assumed. Some photos contain distinctive clues; others show scenery shared by many places. Confirm the destination before using a precise location title.
Use it as the person reference and add a travel photograph for the setting if you want the artwork grounded in a real place. A destination name alone can guide an imagined scene, but that is different from reconstructing the location visible in your own photo.
Yes. For this workflow, save a clear still frame from the clip and upload that image with the prompt. Add a clearer portrait as a separate reference if the person's face is blurred or too small in the frame.
No. “GOA” is fixed text in the supplied version, not proof of automatic location recognition. Keep it for the intended destination or explicitly request the correct confirmed name.
No. This prompt requests a static 3:4 poster. You can use the finished artwork within a separate video project, adapting the framing to that project's layout.